Have you ever wanted your own space to play around with Salesforce, build cool apps, and test out new ideas? Well, you’re in luck! Today, we’re going to talk about How to create a Free Salesforce Developer Org and why it’s easy to set up and awesome for every Salesforce developer. Whether you’re just starting out or already have some experience, a Developer Org is your playground to explore and innovate with Salesforce. Let’s get started!
Table of Contents
What is Salesforce Developer Org?
A Salesforce Developer Org is a free, fully-featured Salesforce environment that developers can use to build, experiment, and test their applications. It’s like having your own personal sandbox where you can try out new ideas without affecting any real business data. In case you are interested in Salesforce’s Future With AI And Data Integration.
Here are some key features:
- Free and Full-Featured to get access to almost all the tools and features available in paid Salesforce editions.
- API Access to connect your Salesforce Org with other apps and services.
- Latest Updates to have the newest Salesforce features to play with.
- Unlimited Usage as you want for development and testing.
Now that you know what it is, let’s create one!
In this post, we’ll guide you through the simple steps to set up your very own Salesforce Developer Account. By the end, you’ll be ready to start building your first app. Let’s dive in!
Imagine having a playground where you can test all your cool ideas without any worries. That’s exactly what a Salesforce Developer Org is! It’s like having your own little piece of Salesforce where you can build, experiment, and learn as much as you want. And the best part? It’s totally free!
Different Types of Salesforce Developer Org Editions
| Salesforce Developer Org Editions | Description | Features |
|---|---|---|
| Essential Edition | Ideal for small teams or businesses just starting with Salesforce. | – Limited features – Basic customization options |
| Professional Edition | Suitable for growing businesses needing more features and customization. | – More features than Essential – Limited API access – Moderate customization options |
| Enterprise Edition | Best for large organizations with complex processes. | – Advanced automation tools – Extensive customization options – Full API access |
| Unlimited Edition | Includes all Enterprise features plus premium support and additional customization options. | – Premium support – Unlimited customization – All Enterprise features – Additional automation tools |
| Developer Edition | A free, fully-functional environment perfect for developers to build, test, and experiment. | – Most Sales and Service Cloud features – Limited storage – Limited custom objects – Full API access |
Steps to Create a Free Salesforce Developer Org
Ready to get started? Head over to the Salesforce Developer website and follow these easy steps to sign up for your free Developer Org.
Alright, it’s time to get your own Salesforce Developer Org! Here’s how you can do it in just a few simple steps. Don’t worry, I’ll guide you through the whole process.
Step 1: Visit the Salesforce Developer Website First, go to the Salesforce Developer Website. This is where you’ll start the sign-up process.
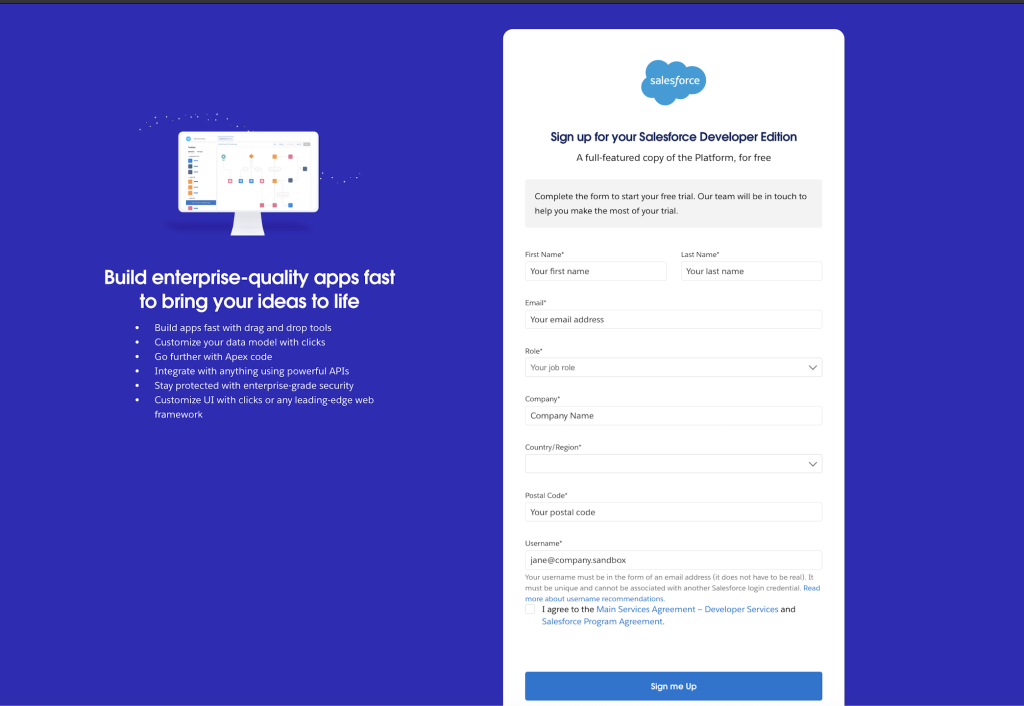
Step 2: Sign Up for a New Account On the sign-up page, you’ll see a form that asks for some basic information. Here’s what you need to enter:
- First Name
- Last Name
- Role
- Company
- Country
- State/Province
- Postal Code
- Username (This must be in the format of an email address, but it doesn’t have to be a real email. Something like “[email protected]” works fine)
Here’s what the form looks like:
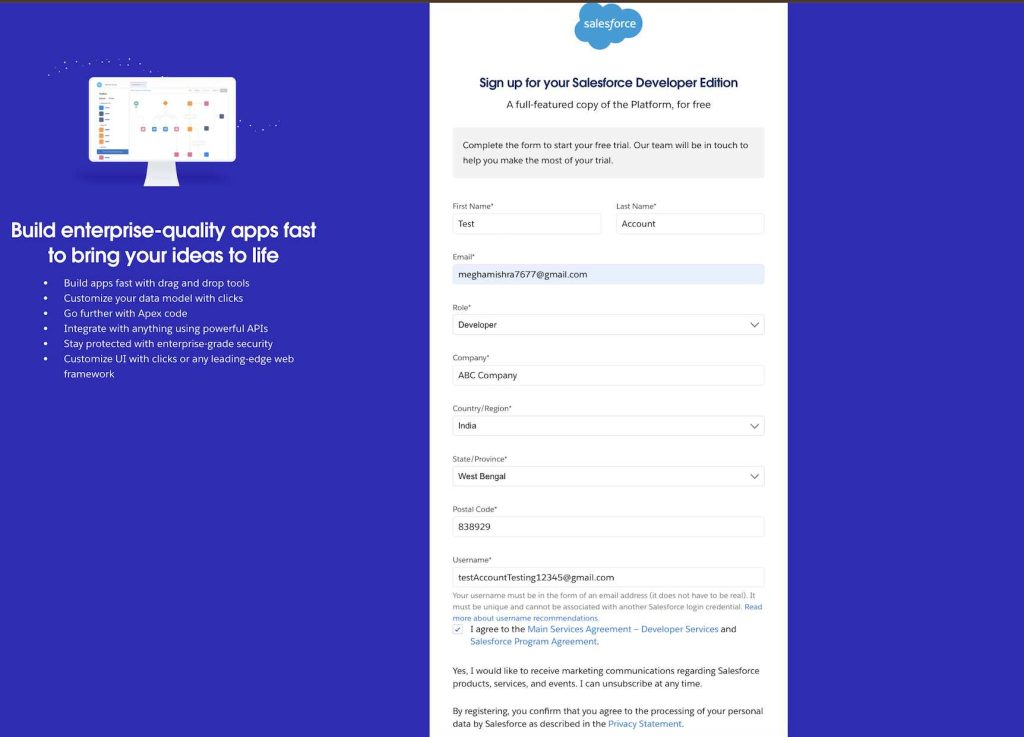
Step 3: Verify Your Email Address After you fill out the form and click Sign Me Up, Salesforce will send you a verification email. Check your inbox for an email from Salesforce. It might take a few minutes, so be patient.
Open the email and click on the verification link inside. This confirms your email address and activates your Developer Org.
Here’s an example of what the email looks like:
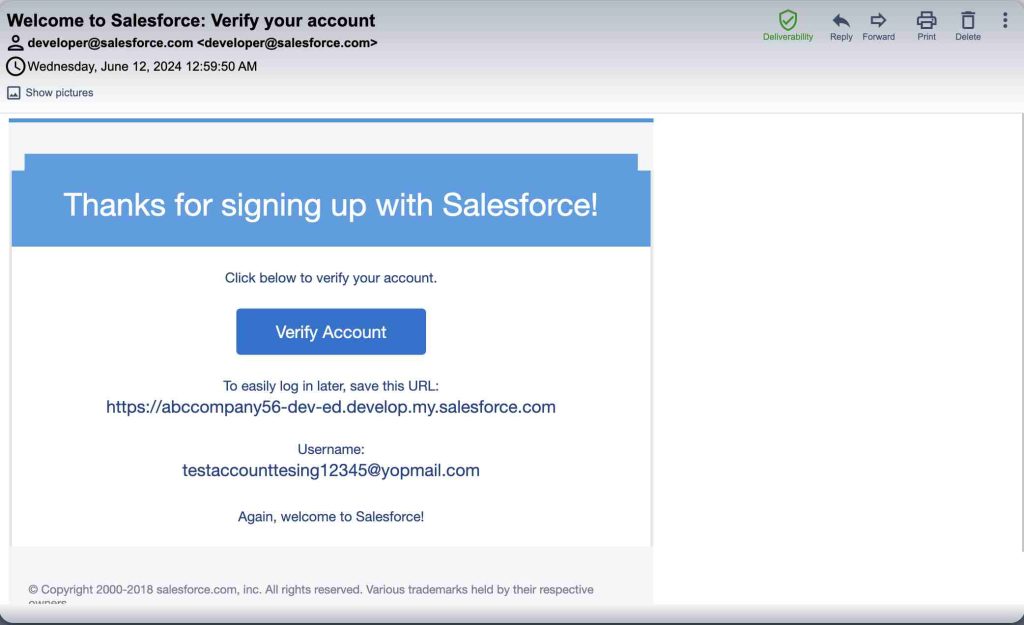
Step 4: Login to Your New Developer Org Once you’ve verified your email, go back to the Salesforce login page. Enter your username and password that you created during sign-up.
When you log in, you’ll see your new Salesforce Developer Org dashboard. It’s your playground now!
Here’s what the login page looks like:
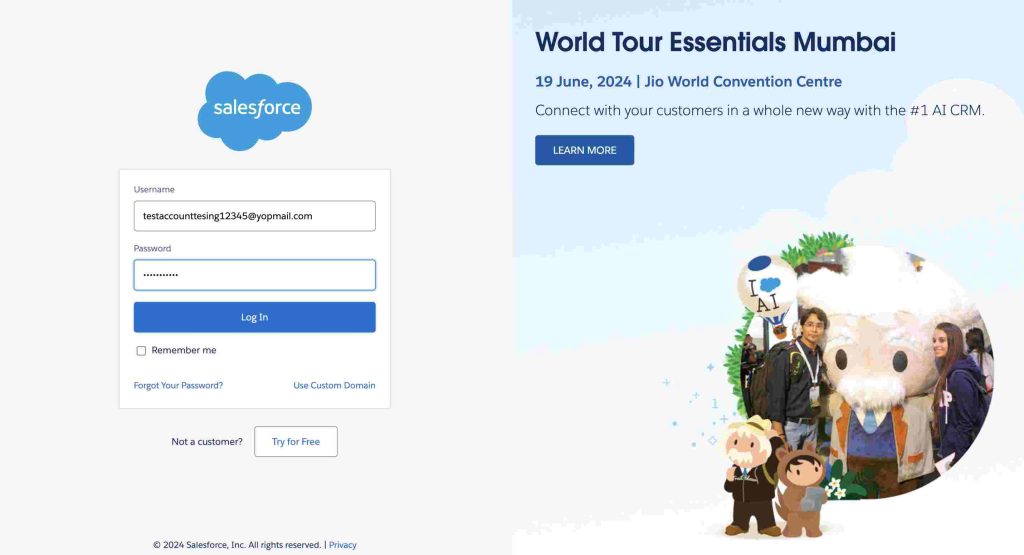
Enter your details, verify your email, and voila! You’ll have access to your own Salesforce playground in no time.
And that’s it! You’ve now got your own Salesforce Developer Org. You can start exploring all the features, building new apps, and having fun with Salesforce. Next, we’ll take a tour of your new Developer Org and show you how to set up your workspace. Exciting, right? Let’s keep going!
Exploring Your Developer Org
Let’s take a tour of your new Developer Org dashboard and familiarize you with its key components.
Welcome to your new Salesforce Developer Org! Now that you’re logged in, let’s explore what’s inside. The dashboard might look a bit overwhelming at first, but don’t worry. We’ll break it down and make it easy to understand.
Home Page When you first log in, you’ll land on the Home page. This is like the main hub of your Developer Org. You’ll see a welcome message, some quick links, and maybe some news from Salesforce. Here’s a quick rundown of what you’ll find:
- Navigation Bar: At the top, you’ll see a navigation bar with tabs like Home, Accounts, Contacts, Opportunities, and more. These tabs help you get to different parts of Salesforce quickly.
- Welcome Message: This is a friendly note from Salesforce to get you started.
- Quick Links: These are shortcuts to important features and settings.
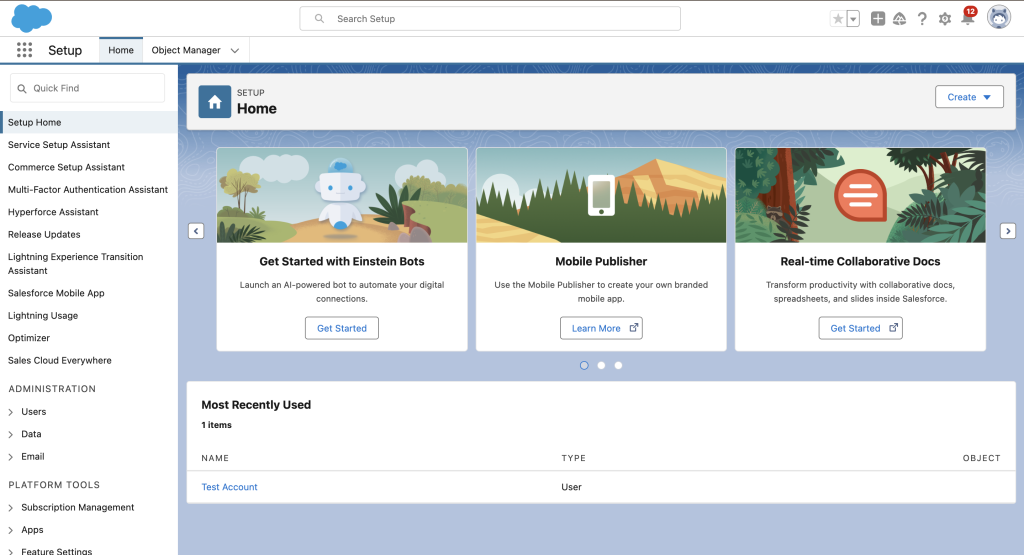
Apps and Tabs In Salesforce, apps are collections of tabs that work together for a specific function. For example, the Sales app includes tabs for managing accounts, contacts, and opportunities. You can switch between apps using the App Launcher (the nine-dot grid icon on the top left).
Customizing Your Dashboard Your Developer Org is all about you, so let’s make it feel like home. Here are some easy ways to customize your workspace:
- You can pin your most-used tabs so they’re always at the top. Just click on a tab, and then click the pin icon.
- Want a different look? Click on your avatar (the circle with your initials or picture) in the top right, then go to Settings > Themes and Branding. Pick a theme that you like.
- Click and drag tabs to move them around. Put the ones you use most often at the front.
Create a Custom List View A list view is a way to see a list of records, like accounts or contacts, that meet certain criteria. Here’s how to create one:
- Go to a Tab
- Click on the Gear Icon
- Name Your List View
- Set Filters
- Save
Explore Setup The Setup area is where you can configure and customize your Salesforce org. You can get there by clicking on the gear icon in the top right and selecting “Setup.”
In Setup, you can:
- Create Custom Objects
- Add Fields
- Automate Processes

Take some time to explore and play around. The more you click around and try things out, the more comfortable you’ll become.
Comparison of Salesforce Developer Edition Orgs
| Feature | Essential Edition | Professional Edition | Enterprise Edition | Unlimited Edition | Developer Edition |
|---|---|---|---|---|---|
| Description | Basic features for small teams | More features for growing businesses | Advanced features for large businesses requiring complex processes | All features of Enterprise plus premium support and additional customization options | Free, fully-featured environment for development and testing, with limitations |
| Data Storage | Limited | Moderate | High | Highest | Limited (200 MB data, 200 MB file storage) |
| Custom Objects | Up to 10 custom objects | Up to 50 custom objects | Up to 200 custom objects | Unlimited custom objects | Up to 10 custom objects |
| API Access | No | Limited | Yes | Yes | Yes |
| Automation Tools | Basic automation tools | Workflow and approvals | Workflow, approvals, and advanced process automation | All Enterprise features plus additional automation tools | Workflow and process builder |
| Customization | Basic page layouts and record types | More customization options than Essential | Highly customizable with advanced tools | All Enterprise features plus more customization options | Customizable, but with some limitations on objects and fields |
| Support | Standard support | Standard support | Standard support with additional features | 24/7 support with fast response times | Standard support |
| Sales and Service Cloud | Basic Sales Cloud features, no Service Cloud | Sales Cloud features, basic Service Cloud features | Full Sales and Service Cloud features | Full Sales and Service Cloud features | Access to most Sales and Service Cloud features for development and testing |
| Upgrades | Limited upgrades | Some upgrade options | Regular updates with new features | Regular updates plus early access to new features | Regular updates to stay current with Salesforce releases |
| Pricing | Entry-level pricing | Mid-range pricing | Higher pricing for large organizations | Premium pricing for extensive features and support | Free |
to Trailhead and building your first app. Let’s keep the momentum going!
Congratulations on setting up your Salesforce Developer Org! You’ve taken the first big step into the exciting environment of Salesforce. Remember, this is just the beginning. Now, it’s time to dive in and start exploring all the amazing things you can do.
Megha
Next Steps
Accelerate your learning with Trailhead, Salesforce’s interactive learning platform. Connect your Developer Org and start your journey with these beginner modules.
Now that you’ve got your Developer Org set up and you’re familiar with the basics, it’s time to start learning and building. Salesforce has an awesome tool called Trailhead. It’s like a fun, interactive school where you can learn all about Salesforce at your own pace.
Connecting Your Developer Org to Trailhead First things first, let’s connect your Developer Org to Trailhead. Here’s how:
- Go to Trailhead: Visit trailhead.salesforce.com.
- Sign Up or Log In: If you don’t have an account, sign up for free. If you already have one, just log in.
- Connect Your Org: Click on your avatar in the top right corner, select “Settings,” then “Connected Accounts,” and finally “Connect an Account.” Choose your Developer Org and follow the prompts.
And there you have it! You’ve set up your Developer Org, explored the dashboard, and taken your first steps towards learning and building with Salesforce. The sky’s the limit from here. Keep exploring, keep learning, and most importantly, have fun with your Salesforce journey!
Conclusion
Creating a Salesforce Developer Org is just the beginning. Start exploring, building, and don’t hesitate to reach out with your questions or share your progress.
Don’t be afraid to try new things. Build apps, customize dashboards, and automate tasks. The more you experiment, the more you’ll learn. And if you ever get stuck or have questions, there’s a whole community of Salesforce enthusiasts ready to help you out.
Additional Resources
Looking for more? Check out these resources to continue your Salesforce adventure.
If you’re eager to keep learning and growing, here are some fantastic resources to help you on your Salesforce journey:
- Trailhead: trailhead.salesforce.com
- Salesforce Community on Reddit: r/Salesforce_Community
- Salesforce Developer Forums: developer.salesforce.com/forums
- Trailblazer Community: trailblazer.salesforce.com
- Salesforce Help & Training: help.salesforce.com
These resources will help you keep learning and stay up-to-date with the latest Salesforce news and features. Happy exploring, and welcome to the Salesforce family!
Feel free to reach out if you need any more help or guidance. Enjoy your Salesforce adventure!

