Welcome to Salesforce Megha! I’m excited to help you get ready for your next Salesforce developer interview after LWC Interview questions preparation. Today, we’re going to talk about Salesforce Apex Trigger Scenario Based Questions. As a Salesforce Developer with vast experience I can tell you that Apex ‘Triggers’ are one of the most important topics you need to know as a Salesforce developer.
Let’s imagine a scenario here. You’re a wizard in a magical library. Every time someone borrows a book (creates a record), returns a book (updates a record), or loses a book (deletes a record), your magical powers automatically do something special. You might send an owl (notification) when a book is borrowed, or you might cast a spell to update the library records.
In Salesforce, Apex Triggers Scenarios work like your personal assistants, automatically taking action whenever specific changes happen to your data, such as when records are added, updated, or deleted.
Table of Contents
What Are Salesforce Apex Triggers?
Salesforce Apex Triggers are like special instructions that run automatically when something happens in Salesforce. A key part of Salesforce’s Apex programming language allows developers to perform custom actions before or after events to records in Salesforce, such as insertions, updates, or deletions. They help us perform custom actions before or after we make changes to the data in Salesforce, like adding, updating, or deleting records.
Why Are Apex Triggers Important for Salesforce Developers?
Knowing how to use Apex Triggers is super important for a few reasons:
- Automate Processes: They help you automate and streamline business processes, making your job easier and your applications more efficient.
- Custom Actions: You can use them to create custom actions that meet specific business needs, which every company looks for in a developer.
- Data Integrity: Triggers help maintain data integrity by automatically enforcing rules and validation checks.
Why Is This Topic Important for Interviews?
Apex Triggers Scenario-based interview questions are very crucial in Salesforce developer interviews. Why? Because they test your understanding of how Salesforce works behind the scenes and your ability to write clean, efficient code. Interviewers often ask about triggers to see if you can think critically and solve problems using Apex. If you know your way around triggers, you’ll impress your interviewers and show that you’re ready to handle complex tasks in Salesforce.
In this Interview series, we’ll dive into some of the most common Apex Trigger interview questions. I’ll explain each question in simple terms, give you examples, and share tips to help you prepare. Whether you’re new to Salesforce or a seasoned pro, this guide will help you ace those interview questions and land your dream job.
Let’s get started!
Basic Salesforce Apex Trigger Interview Questions
What is a Salesforce Apex Trigger?
A Salesforce Apex Trigger is like a special set of instructions that automatically run when certain events happen in Salesforce. Think of it as a helpful robot that does specific tasks whenever you add, update, or delete records in Salesforce. These triggers help us automate tasks and make sure our data stays accurate and consistent.
Types of Triggers
There are two main types of triggers in Salesforce:
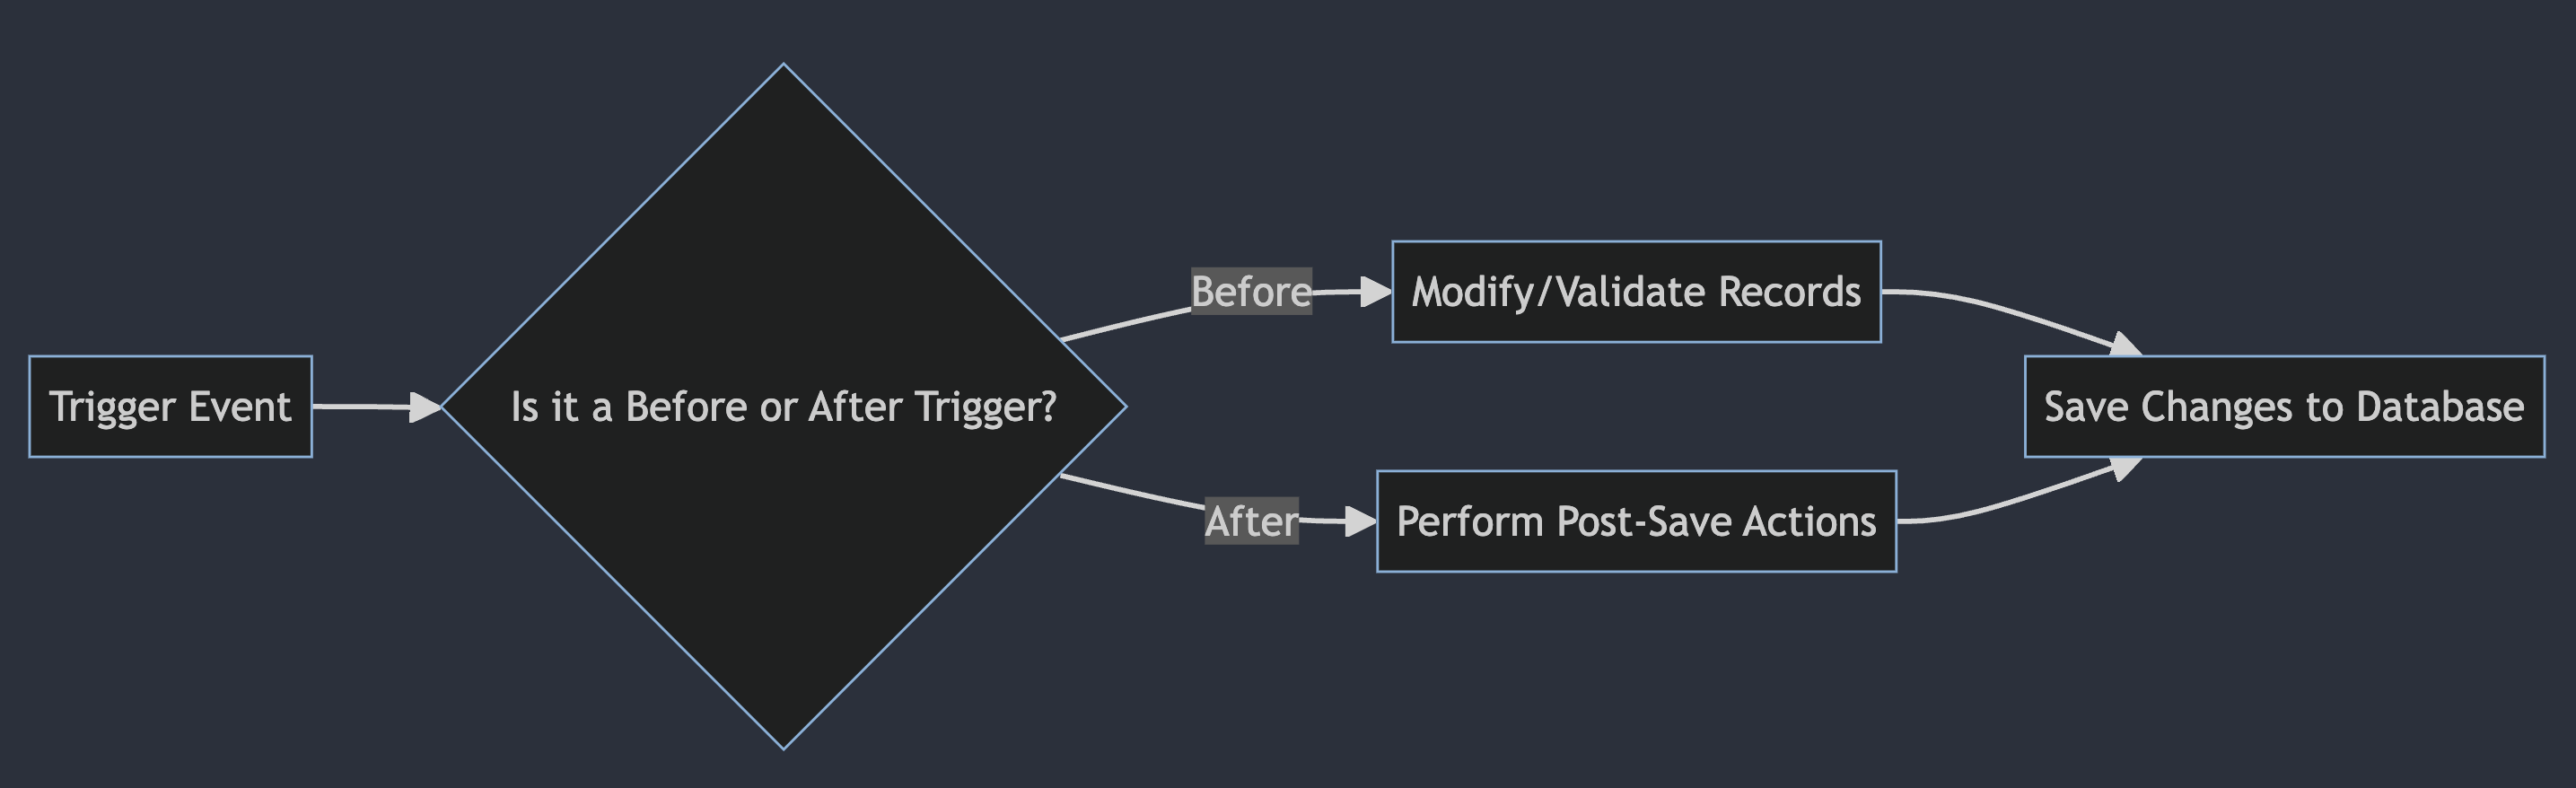
Before Triggers: These triggers run before a record is saved to the database. You use “before” triggers when you want to update or check values before the record is actually saved. It’s like making sure everything is correct before you submit your homework.
After Triggers: These triggers run after a record is saved to the database. You use “after” triggers when you need to use the information that the system generates, like a new record’s ID. It’s like checking your grades after your homework is submitted to see if it was accepted.
When Do We Use “Before” and “After” Triggers?
Before Triggers
- Scenario: You want to make sure all account names are in uppercase before saving.
- Example: You have a rule that says all account names must be in uppercase letters.
Code Snippet
trigger AccountBeforeInsert on Account (before insert) {
    for (Account acc : Trigger.new) {
        acc.Name = acc.Name.toUpperCase();
    }
}After Triggers
- Scenario: You want to create a related contact record after an account is created.
- Example: Whenever a new account is created, you automatically create a main contact for that account.
Code Snippet
trigger AccountAfterInsert on Account (after insert) {
    List<Contact> contactsToCreate = new List<Contact>();
    for (Account acc : Trigger.new) {
        Contact con = new Contact();
        con.LastName = acc.Name + ' Contact';
        con.AccountId = acc.Id;
        contactsToCreate.add(con);
    }
    if (contactsToCreate.size() > 0) {
        insert contactsToCreate;
    }
}What Are the Context Variables in Apex Triggers?
Context variables in Apex Triggers give you information about the records that are being processed. Here are the main ones:
- Trigger.new: This variable holds a list of the new versions of the records that are being inserted or updated. It’s like a preview of the new records.
- Trigger.old: This variable holds a list of the old versions of the records that are being updated or deleted. It’s like a snapshot of the records before they were changed.
- Trigger.newMap: This variable is like
Trigger.newbut in a map format. It maps the record IDs to the new versions of the records. - Trigger.oldMap: This variable is like
Trigger.oldbut in a map format. It maps the record IDs to the old versions of the records.
Example
Let’s say we’re updating account records, and we want to compare the old and new values to see if the account name has changed.
Code Snippet
trigger AccountBeforeUpdate on Account (before update) {
    for (Account acc : Trigger.new) {
        Account oldAcc = Trigger.oldMap.get(acc.Id);
        if (acc.Name != oldAcc.Name) {
            System.debug('Account name changed from ' + oldAcc.Name + ' to ' + acc.Name);
        }
    }
}In this example, we use Trigger.new to get the new version of the account record and Trigger.oldMap to get the old version. We then compare the names to see if they’ve changed.
Now that we’ve covered the basics, you’re ready to dive deeper into Apex Triggers. In the next section, we’ll tackle some intermediate questions to build on what we’ve learned so far.
Intermediate Salesforce Apex Trigger Interview Questions
Explain the Concept of Bulkification in Apex Triggers.
Bulkification is a fancy word that means writing your code so it can handle lots of records at once, not just one. This is super important in Salesforce because sometimes you need to process many records at the same time, like when you import a big batch of data.
Why is Bulkification Important?
Efficiency: It makes your code run faster and use fewer resources.
Avoiding Limits: Salesforce has limits on how many times you can interact with the database in one go. Bulkified code helps you stay within those limits.
Best Practices for Bulkification
- Use Collections: Work with lists or maps instead of individual records.
- Minimize DML Statements: Only update the database once per trigger, not inside a loop.
- Use SOQL Queries Wisely: Only query the database once, and avoid querying inside loops.
Code Snippet
Here’s an example of a bulkified trigger that updates the status of multiple accounts at once:
trigger AccountStatusUpdate on Account (before update) {

    for (Account acc : Trigger.new) {
        if (acc.Industry == 'Technology') {
            acc.Status__c = 'Tech Industry';
        }
    }
}In this example, we collect all the accounts that need updating into a list and then update them all at once.
How Can You Prevent Recursion in Triggers?
Recursion happens when a trigger keeps calling itself over and over, creating an infinite loop. This can happen if your trigger makes changes that cause the trigger to fire again. To prevent this, you can use a static variable to keep track of whether your trigger has already run.
Methods to Prevent Recursion
- Static Variables: Use a static variable to check if the trigger has already run.
- Set a Flag: Set a flag at the beginning of your trigger to prevent it from running again.
Code Snippet
Here’s an example of using a static variable to prevent recursion:
public class TriggerHelper {
    public static Boolean isTriggerExecuted = false;
}

trigger PreventRecursionTrigger on Account (before update) {
    if (TriggerHelper.isTriggerExecuted) {
        return;
    }

    TriggerHelper.isTriggerExecuted = true;

    for (Account acc : Trigger.new) {
        if (acc.Industry == 'Technology') {
            acc.Status__c = 'Tech Industry';
        }
    }
}In this example, the static variable isTriggerExecuted ensures that the trigger only runs once.
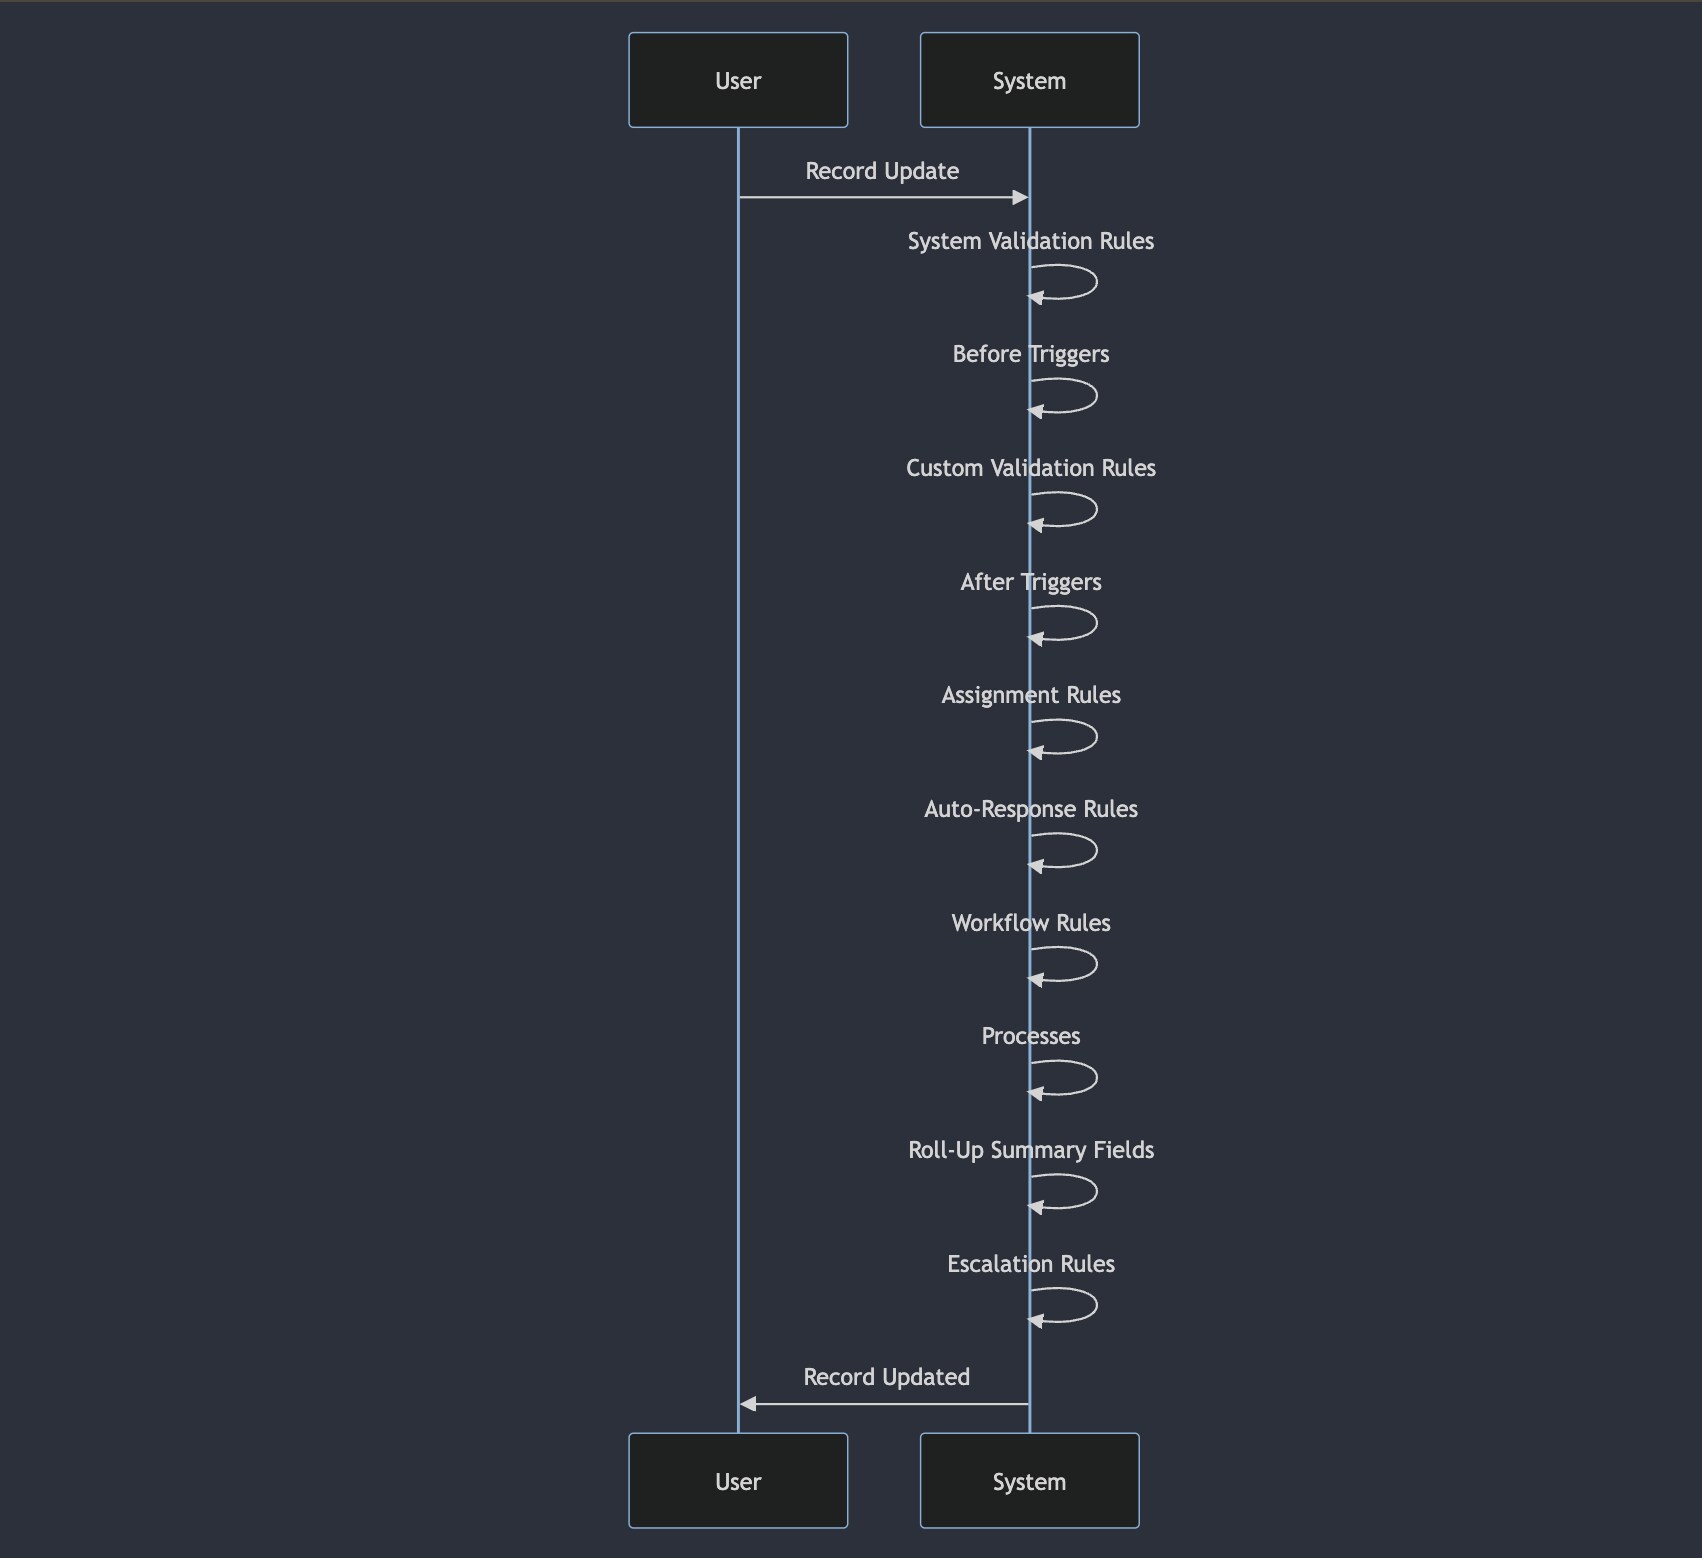
Explain the Order of Execution in Salesforce Triggers.
When you perform an action in Salesforce, like updating a record, several things happen in a specific order. This sequence is known as the “Order of Execution.” Let’s break it down step by step:
- System Validation Rules: First, Salesforce checks the system validation rules. These are basic checks like ensuring required fields are filled in.
- Before Triggers: Next, Salesforce runs any “before” triggers. These are special sets of instructions that run before the record is saved to the database. For example, you might have a before trigger that converts all account names to uppercase.
- Custom Validation Rules: After the before triggers, Salesforce checks the custom validation rules you’ve set up. These rules ensure that the data meets your specific requirements.
- Duplicate Rules: Salesforce then checks for duplicates if you have any duplicate rules set up.
- After Triggers: Once the record passes validation, Salesforce runs the “after” triggers. These are instructions that run after the record is saved. For instance, you might create a task after an opportunity is closed won.
- Assignment Rules: Next, Salesforce processes assignment rules. These rules automatically assign records to users or queues based on the criteria you define.
- Auto-Response Rules: If you’re dealing with leads or cases, Salesforce processes auto-response rules. These rules send automatic responses to customers.
- Workflow Rules: After assignment and auto-response rules, Salesforce runs workflow rules. Workflows can update fields, send emails, create tasks, or even trigger more actions.
- Processes: Salesforce then runs processes set up in Process Builder. These can perform more complex actions based on your business needs.
- Escalation Rules: For cases, Salesforce checks escalation rules. These rules escalate cases to higher support levels if they are not resolved within a certain time frame.
- Entitlement Rules: If you have entitlements, Salesforce processes them next. These rules ensure customers receive the right level of support.
- Roll-Up Summary Fields: If you have any roll-up summary fields, Salesforce updates them at this point. These fields calculate values from related records.
- Criteria-Based Sharing Rules: Finally, Salesforce evaluates criteria-based sharing rules to update record visibility.
- Commit Changes: If everything passes without errors, Salesforce commits the changes to the database.
- Post-Commit Logic: After committing, Salesforce runs any post-commit logic, like sending email notifications or executing queued jobs.
Describe a Use Case for Using an “After Undelete” Trigger
An “after undelete” trigger runs after a record is restored from the Recycle Bin. This is useful when you need to restore related data or perform actions that should only happen after a record is brought back to life.
Practical Example
Imagine you have a custom object called Project__c that gets deleted. When a project is undeleted, you want to notify the project manager.
Code Snippet
trigger ProjectAfterUndelete on Project__c (after undelete) {
    List<Id> projectManagerIds = new List<Id>();

    for (Project__c proj : Trigger.new) {
        projectManagerIds.add(proj.Project_Manager__c);
    }

    List<User> projectManagers = [SELECT Id, Email FROM User WHERE Id IN :projectManagerIds];

    for (User manager : projectManagers) {
        // Send email notification (pseudo-code)
        sendEmail(manager.Email, 'Project Restored', 'Your project has been restored.');
    }
}

public void sendEmail(String email, String subject, String body) {
    // Code to send an email
}In this example, the trigger collects the IDs of the project managers from the restored projects, queries their emails, and then sends them a notification.
Now that we’ve covered these intermediate questions, you’re getting a stronger grip on Apex Triggers. In the next section, we’ll tackle some advanced questions to really hone your skills.
Advanced Salesforce Apex Trigger Interview Questions
How Do You Handle Exceptions in Triggers?
Handling exceptions in triggers means making sure that your code can deal with errors without crashing. Imagine you’re playing a video game, and something goes wrong. Instead of the game freezing, it shows a friendly message and helps you continue. That’s what exception handling does in your code.
Best Practices for Handling Exceptions
- Try-Catch Blocks: Use try-catch blocks to catch and handle exceptions.
- Custom Error Messages: Provide helpful error messages so you know what went wrong.
- Avoid Silent Failures: Make sure errors are logged or reported, so they don’t go unnoticed.
Code Snippet
Here’s an example of handling exceptions in a trigger:
trigger AccountTrigger on Account (before insert, before update) {
    try {
        for (Account acc : Trigger.new) {
            if (acc.Name == null) {
                throw new CustomException('Account name cannot be blank.');
            }
        }
    } catch (Exception e) {
        System.debug('An error occurred: ' + e.getMessage());
        // Optionally, you can rethrow the exception to abort the DML operation
        // throw e;
    }
}

public class CustomException extends Exception {}In this example, we use a try-catch block to handle the error if an account name is blank. The custom error message helps identify the issue.
What Are Trigger Frameworks and Why Are They Important?
Trigger frameworks are like blueprints for organizing your trigger code. They help you keep your code clean, organized, and easy to manage. Imagine building a house: you wouldn’t just throw bricks around; you’d follow a plan. That’s what trigger frameworks do for your code.
Why Are They Important?
Separation of Concerns: They separate different parts of your code, making it easier to understand and maintain.
Reusability: They allow you to reuse code, reducing duplication.
Consistency: They provide a consistent way to handle triggers, making your code more predictable.
Example Framework
One popular trigger framework is the Trigger Handler Framework. Here’s a simple example of how it works:
Code Snippet
- Trigger
trigger AccountTrigger on Account (before insert, before update) {
    if (TriggerHandler.runOnce()) {
        AccountTriggerHandler handler = new AccountTriggerHandler();
        handler.beforeInsert(Trigger.new);
        handler.beforeUpdate(Trigger.new, Trigger.oldMap);
    }
}- Handler Class
public class AccountTriggerHandler {
    public void beforeInsert(List<Account> newAccounts) {
        for (Account acc : newAccounts) {
            acc.Name = acc.Name.toUpperCase();
        }
    }

    public void beforeUpdate(List<Account> newAccounts, Map<Id, Account> oldAccounts) {
        for (Account acc : newAccounts) {
            Account oldAcc = oldAccounts.get(acc.Id);
            if (acc.Name != oldAcc.Name) {
                System.debug('Account name changed from ' + oldAcc.Name + ' to ' + acc.Name);
            }
        }
    }
}In this example, the trigger calls a handler class, which contains the logic for different trigger events. This keeps the trigger code clean and organized.
Describe a Complex Trigger Scenario You’ve Worked On
In one of my projects, we had a scenario where we needed to automatically create a task for the account manager whenever a high-value opportunity was closed won. This was tricky because we needed to ensure the task was only created once and had all the necessary details.
Steps Taken
- Identify the Criteria: The trigger should run after an opportunity is updated to closed won.
- Fetch Related Records: We needed to get the account manager’s details.
- Create the Task: Automatically create and assign the task to the account manager.
Code Snippet
trigger OpportunityAfterUpdate on Opportunity (after update) {
    List<Task> tasksToCreate = new List<Task>();

    for (Opportunity opp : Trigger.new) {
        Opportunity oldOpp = Trigger.oldMap.get(opp.Id);

        if (opp.StageName == 'Closed Won' && oldOpp.StageName != 'Closed Won' && opp.Amount > 100000) {
            Task task = new Task();
            task.Subject = 'Follow up with client';
            task.WhatId = opp.Id;
            task.OwnerId = opp.Account.OwnerId;
            task.Status = 'Not Started';
            tasksToCreate.add(task);
        }
    }

    if (tasksToCreate.size() > 0) {
        insert tasksToCreate;
    }
}In this example, the trigger checks if the opportunity is updated to closed won and if the amount is over $100,000. It then creates a follow-up task for the account manager.
Now that we’ve covered some advanced questions, you should have a solid understanding of how to handle more complex Apex Trigger scenarios in Salesforce. In the next section, we’ll provide practical examples and additional tips to help you succeed in your Salesforce journey.
Practical Salesforce Apex Trigger Examples
Write a Simple Trigger for Updating a Related Record
Sometimes, you need to update a related record whenever something changes. For example, if you update an account’s phone number, you might want to update the phone numbers of all the related contacts. Here’s a step-by-step example of how to do this.
Step-by-Step Example
- Understand the Requirement: When an account’s phone number changes, update the phone numbers of all related contacts to match.
- Create the Trigger: Write the code to perform this action.
Code Snippet
trigger UpdateContactPhone on Account (after update) {
    List<Contact> contactsToUpdate = new List<Contact>();

    // Collect Account IDs where Phone changed
    Set<Id> accIdsWithPhoneChange = new Set<Id>();
    for (Account acc : Trigger.new) {
        Account oldAcc = Trigger.oldMap.get(acc.Id);
        if (acc.Phone != oldAcc.Phone) {
            accIdsWithPhoneChange.add(acc.Id);
        }
    }

    // Bulk SOQL query outside the loop
    if (!accIdsWithPhoneChange.isEmpty()) {
        for (Contact con : [SELECT Id, Phone, AccountId FROM Contact WHERE AccountId IN :accIdsWithPhoneChange]) {
            con.Phone = Trigger.newMap.get(con.AccountId).Phone;
            contactsToUpdate.add(con);
        }
    }

    if (contactsToUpdate.size() > 0) {
        update contactsToUpdate;
    }
}Explanation
- Trigger Event: This trigger runs after an account is updated.
- Check Phone Change: It checks if the account’s phone number has changed.
- Update Contacts: If the phone number has changed, it updates the phone numbers of all related contacts.
- Bulk Update: It collects all the contacts to update in a list and then updates them all at once.
Create a Trigger to Enforce a Business Rule
Sometimes, you need to enforce business rules automatically. Let’s create a trigger that prevents the deletion of an account if it has active opportunities. This ensures that important records are not accidentally deleted.
Step-by-Step Example
- Understand the Requirement: Prevent the deletion of an account if it has active (open) opportunities.
- Create the Trigger: Write the code to check for active opportunities before allowing deletion.
Code Snippet
trigger PreventAccountDeletion on Account (before delete) {
    Set<Id> accountIds = new Set<Id>();

    for (Account acc : Trigger.old) {
        accountIds.add(acc.Id);
    }

    // Query for active opportunities
    Set<Id> accountsWithActiveOpps = new Set<Id>();
    for (Opportunity opp : [SELECT AccountId FROM Opportunity WHERE AccountId IN :accountIds AND IsClosed = false]) {
        accountsWithActiveOpps.add(opp.AccountId);
    }

    for (Account acc : Trigger.old) {
        if (accountsWithActiveOpps.contains(acc.Id)) {
            acc.addError('Cannot delete account with active opportunities.');
        }
    }
}- Trigger Event: This trigger runs before an account is deleted.
- Collect Account IDs: It collects the IDs of the accounts being deleted.
- Query Active Opportunities: It queries for any active (open) opportunities related to those accounts.
- Prevent Deletion: If there are active opportunities, it prevents the deletion by showing an error message.
Additional Practical Salesforce Apex Trigger Examples
Example 1: Trigger to Update a Field Based on Another Field
Let’s say you want to update a custom field Status__c to “Inactive” when the IsActive checkbox is unchecked.
Code Snippet
trigger UpdateStatusField on Contact (before update) {
    for (Contact con : Trigger.new) {
        if (!con.IsActive__c) {
            con.Status__c = 'Inactive';
        }
    }
}Explanation
- Trigger Event: This trigger runs before a contact is updated.
- Check IsActive: It checks if the
IsActivecheckbox is unchecked. - Update Status: If unchecked, it sets the
Status__cfield to “Inactive”.
Example 2: Trigger to Create a Task for New High-Value Opportunities
Create a task for the account owner whenever a new high-value opportunity (e.g., Amount > $100,000) is created.
Code Snippet
trigger CreateTaskForHighValueOpp on Opportunity (after insert) {
    List<Task> tasksToCreate = new List<Task>();

    for (Opportunity opp : Trigger.new) {
        if (opp.Amount > 100000) {
            Task task = new Task();
            task.Subject = 'Follow up on high-value opportunity';
            task.WhatId = opp.Id;
            task.OwnerId = opp.Account.OwnerId;
            task.Status = 'Not Started';
            tasksToCreate.add(task);
        }
    }

    if (tasksToCreate.size() > 0) {
        insert tasksToCreate;
    }
}Explanation
- Trigger Event: This trigger runs after an opportunity is inserted.
- Check Opportunity Amount: It checks if the opportunity amount is greater than $100,000.
- Create Task: If it is, it creates a follow-up task for the account owner.
Now that we’ve gone through some practical examples, you should feel more confident about writing and understanding Apex Triggers. These examples show how triggers can automate tasks and enforce business rules, making your Salesforce applications more powerful and efficient.
My Best Tips for Salesforce Apex Trigger Interviews
How to Prepare for Apex Trigger Questions in an Interview?
To prepare effectively for Apex Trigger questions in an interview, you need to follow a few key steps. Here’s a guide to help you get ready:
- Understand the Basics:
- Make sure you understand what Apex Triggers are and how they work. Review the types of triggers and when to use “before” and “after” triggers.
- Practice Writing Code:
- Write different types of triggers to get comfortable with the syntax and logic. Practice updating related records, enforcing business rules, and handling exceptions.
- Review Context Variables:
- Know the context variables like
Trigger.new,Trigger.old,Trigger.newMap, andTrigger.oldMap. Understand how and when to use them.
- Know the context variables like
- Study Real-World Examples:
- Look at real-world scenarios in salesforce where apex triggers are used. Try to understand the problem being solved and how the trigger helps.
- Use Online Resources:
- Utilize online resources like Trailhead, Salesforce documentation, and developer forums. These can provide valuable insights and practice problems.
- Mock Interviews:
- Conduct mock interviews with friends or colleagues. Practice answering questions out loud and writing code on a whiteboard or paper.
Common Mistakes to Avoid in Apex Triggers
Some common pitfalls include
1. Not Bulkifying Code: Always write your triggers to handle multiple records. This is crucial for performance and staying within Salesforce’s limits.
Example of Non-Bulkified Code
trigger WrongTrigger on Account (before update) {
    for (Account acc : Trigger.new) {
        acc.Name = acc.Name.toUpperCase();
        update acc; // This is bad practice
    }
}Corrected Bulkified Code
trigger CorrectTrigger on Account (before update) {
    for (Account acc : Trigger.new) {
        acc.Name = acc.Name.toUpperCase();
    }
}2. Ignoring Governor Limits: Salesforce has limits on the number of operations you can perform in a single transaction. Make sure your code is efficient and respects these limits.
3. Not Handling Exceptions: Always use try-catch blocks to handle exceptions and ensure your code can deal with errors gracefully.
4. Recursion: Make sure your trigger does not call itself over and over. Use static variables to prevent infinite loops.
Example
public class TriggerHelper {
    public static Boolean isTriggerExecuted = false;
}

trigger PreventRecursionTrigger on Account (before update) {
    if (TriggerHelper.isTriggerExecuted) {
        return;
    }

    TriggerHelper.isTriggerExecuted = true;

    for (Account acc : Trigger.new) {
        acc.Name = acc.Name.toUpperCase();
    }
}5. Hardcoding Values
Avoid hardcoding values in your trigger. Use custom settings or labels to make your code flexible and maintainable.
Resources and Further Reading
For more in-depth knowledge about Apex Triggers, check out these resources:
- Apex Developer Guide: Apex Developer Guide
- Trailhead: trailhead.salesforce.com
- Salesforce Community on Reddit: r/Salesforce_Community
- Salesforce Developer Forums: developer.salesforce.com/forums
- Trailblazer Community: trailblazer.salesforce.com
- Salesforce Help & Training: help.salesforce.com
- Trailhead: Salesforce’s interactive learning platform offers modules on Apex Triggers.
By following these tips and using these resources, you’ll be well-prepared for any Apex Trigger questions that come your way in an interview. Good luck!
Conclusion
Understanding Apex Triggers is not just about knowing the syntax; it’s about mastering the concepts and applying best practices to create robust Salesforce applications. I hope this guide helps you prepare for your next interview.
Don’t forget to share your experiences and questions in the comments below!